

Layout Pixel Size For Mobile App Icon Design
Design a textured app icon in Fireworks
This article first appeared in issue 228 of .net magazine – the world's best-selling magazine for web designers and developers.
Ever since the iPhone launched in 2007 the demand for mobile application design has continued its upwards trajectory. Many of us who had traditionally worked on web projects for a living suddenly found ourselves taking on design contracts solely for mobile interfaces.
Four years have now passed since the release of the iPhone SDK, and with other platforms such as Android and BlackBerry cornering their shares of the market, it doesn't look as if the mobile wars will be ending any time soon. But whatever the platform, there's something all these bits of software have in common. Every app has an icon.
Virtual packaging
Working in a similar way to packaging design, app icons are often the first thing we see before making a purchase. In just a few milliseconds, the aesthetics of that little square of pixels can make the difference between a download, or simply swiping away to look at another app. It therefore makes sense to spend time considering the best way to create an app icon. Whether it's through treatment of a logo or something more abstract, an icon needs to be eye-catching – and ideally give the user a good idea of what the app does.
In this tutorial we're going to use Fireworks to create an app icon for a fictional basketball game. Because realistic textures can really enhance icons, I'll show you a quick and simple way to replicate a brushed metal effect, along with some simple lighting techniques that will really make your icons stand out from the herd.
1. Canvas
Open the file Canvas.png. To help get us started it's been pre-ruled and I've also added a dark textured background. This isn't integral to the icon itself so can be removed at the end of the tutorial, but for now we'll leave it locked in place so we don't accidentally select it.
2. Texture
Draw a circle with a diameter of 750px. Set the colour to #000000 and centre it on the canvas using the Align tools. In the Properties panel apply a Mesh texture with 100% opacity. In the filters drop-down choose Blur>Radial Blur and set attributes amount: 45; quality: 100.
3. Masking 1
We've applied a radial blur, so before we mask anything we must right-click the circle and select Group. Draw a rounded rectangle 512px high and wide between the outer guides; set colour as #FFFFFF. Using the yellow diamonds, pull the radius to the second guides.
4. Masking 2
To finalise the mask, select the circle and rectangle and choose Modify>Mask>Group As Mask. So the app stands off our canvas, apply a drop shadow with attributes colour: #000000, distance: 0, opacity: 100%, softness: 22. We now have the textured base of the icon.
5. Make it shine 1

Draw a new rounded rectangle 512px high and wide, centre it on the canvas and give it the same radius as the one we created in step 3. In the Properties panel click the Fill category drop-down and then choose Gradient>Cone.
6. Make it shine 2
Select the colour in the Properties panel and in the pop-up set the left and right colours to #FFFFFF. Hover your mouse underneath the middle point of the colour strip until you see the + sign and click once. Set the new colour in the cone to be #666666.
7. Make it shine 3
Add two more colours to the cone, each roughly an eighth from either end of the scale, and set both to #B3B3B3. To angle the shine simply pull the gradient direction arm down to the bottom right corner of the rectangle. In the properties panel, set opacity to 65%.
8. Add detail

Still in the Properties panel, click on the Filters drop-down and pick Shadow and Glow>Inner Glow. Set attributes of colour: #000000, width: 5, opacity: 65%, softness: 3. In the Shapes drop-down of the toolbar choose Doughnut; draw a shape on the canvas 435px high and wide.
9. More detail
With the yellow diamond on the right, make the doughnut wall roughly 45px wide. From the Fill category drop-down, choose Gradient>Linear. Click on the colour and in the pop-up set start colour to #000000 and end colour to #FFFFFF. Reduce opacity to 40%.
10. The core
Duplicate the doughnut we've just created, set its width and height to 294px and then centre it on the canvas. Click and pull the right-hand diamond all the way into the centre point so there's no longer a wall (and no longer a doughnut).
11. Black ring
Draw one last doughnut in the centre of the canvas with a width and height of 400px. Make the wall thickness roughly 30px and give it a solid colour of #000000. The darkness of this ring will nicely frame the basketball we're going to create next.
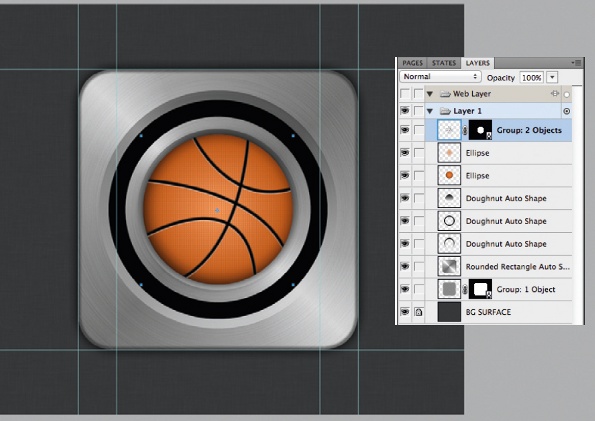
12. Basketball
Using the Shape tool centre a circle 274px in diameter on the canvas. Give it a radial gradient, inner colour #EC884C and outer one #B8501B. In the filters, select Shadow and Glow>Inner Shadow. Set distance: 7, colour: #000000, opacity 100%, softness: 30, angle: 35°.
13. Effects
Select Shadow and Glow>Drop Shadow with attributes distance: 0, colour: #000000, opacity 90%, softness: 20. Duplicate the circle just created, removing the filters. In the Colour pop-up set outer opacity to 10%; in the Texture drop-down pick waffle and change opacity to 65%.
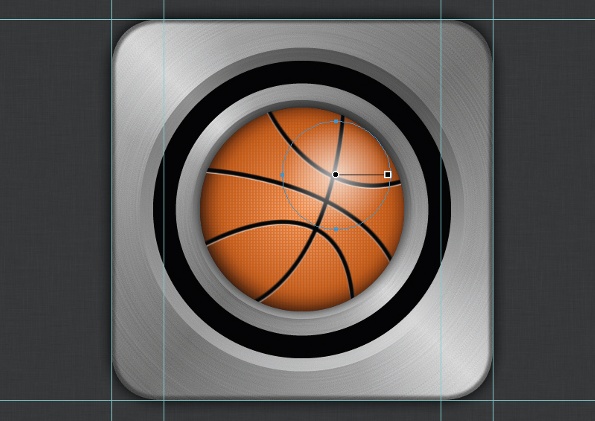
14. Further detail
Using the Pen tool, draw a series of 6px thick curved black lines to create the seams. To make sure your lines look smooth, in the Stroke Category drop-down, check that they're set to Basic>Soft line. Don't worry about going over the ball edges; these will be masked shortly.
15. Depth
Select all the black strokes from the last step and group them together. Duplicate the group and change the colour to #FFFFFF. In the Layers panel pull the new group of white strokes below the black ones and then on the canvas nudge them downward by about 2px.
16. Tidying up
To neatly crop the seam edges, start by grouping the two stroke sets together. Draw a solid white circle 274px high and wide and centre it directly above the strokes. Now select both items and choose Modify>Mask>Group as Mask.
17. Lighting
Draw a circle 145px in diameter and position it over the top right portion of the basketball. Give it a radial gradient with an inner colour of #FFFFFF and an outer colour of #FFFFFF. Set the outer colour opacity to 0% and then bring down the overall shape opacity to 70%.
18. Screw covers
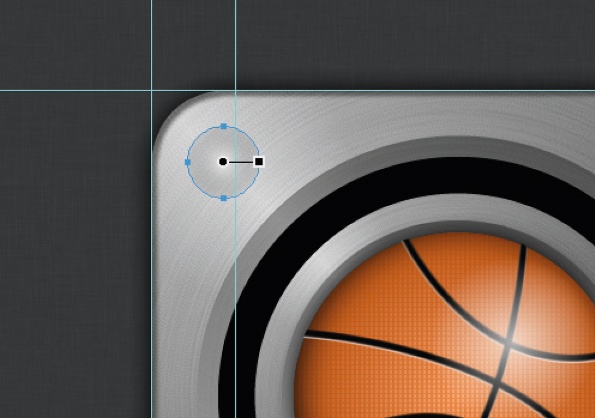
Draw a new circle, diameter 60px and position it 30px from the top guide and 30px from the left guide. Give it a radial gradient with an inner colour of #FFFFFF and an outer one of #333333. Make the outer colour opacity 18%, the overall shape opacity 60%.
19. Final touches
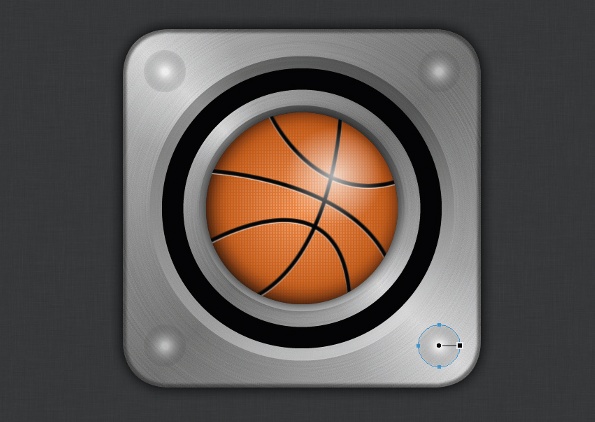
In the Properties colour pop-up, move the inner colour about an eighth along the colour bar. The screw cover's now complete so all that's left is to duplicate it three times and position these in the icon corners. Done: the icon's ready to scale and export.
Discover the 20 best Photoshop plugins over at Creative Bloq.
Related articles
Layout Pixel Size For Mobile App Icon Design
Source: https://www.creativebloq.com/ipad/design-textured-app-icon-fireworks-12125920
Posted by: salinasfics1951.blogspot.com
0 Response to "Layout Pixel Size For Mobile App Icon Design"
Post a Comment